Sunday, January 10, 2021

Drawer Hardware

Between work, Covid, and writing projects, we haven’t taken time to do a post in a long time. But here are some thoughts on the fascinating subject of drawer hardware. 

When we started out, we didn’t build a lot of drawers, and mostly the ones we built did not have drawer hardware at all; they moved on wooden slides. Our neighbor, Ted Dodd made a lot of drawers on his projects, and had worked out a way to make highly functional full extension slides just with wood. At the time, this seemed excessive to me. 

Now I know better: good full extension drawers are a key part of good storage, good accessibility, and good kitchen design. I’ve never learned to make these slides out of wood, but we do use a lot of good full extension hardware. 


The classic Accuride 4034
 

We tried out a variety of drawer slides, but finally stumbled on the Accuride 4034, a “file drawer slide”, 150 lbs capacity, available in a variety of lengths and made in the USA. This was maybe forty years ago, or more. 

These slides don’t last forever; after fifteen or twenty years, a few will need to be replaced. But they are still available, and still my favorite. They do have two drawbacks: you have to close the drawer yourself. And the hardware is visible. If that’s indeed a drawback. 

Now the fashion is for concealed, undermount, “soft-close” hardware. The brand we use is made by the German outfit Blum, which I believe originated the design. They are very popular on manufactured cabinets. Probably half of our customers ask us for these. 

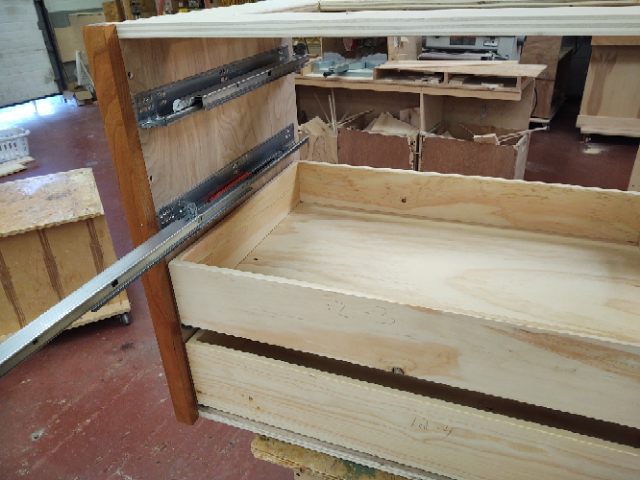
Blum soft-close “Blumotion” slides (without the finish drawer front).

I resisted these at first. Why conceal the drawer hardware? Is it so hard to close a drawer? But customers insisted. At first this new system seemed to make drawer building more complicated, and installation much more difficult. I have since learned that the slides are in fact really clever, not that hard to use, easy to install, and work really well. So I have become a begrudging fan. 

However, they do have some significant drawbacks. They are complex, and have a bunch of plastic parts and little springs which provide the self-closing function. Will they last as long as the Accuride? Who knows, though we have had no failures to date. My biggest observation is that they waste a lot of storage space. The hardware below or between the drawers is bulky. About an extra inch of potential storage space is taken up by the hardware, per drawer. So if a stack of 4 Accuride drawers gives you a net 26” of vertical capacity, your Blumotion drawers will give you about 23”. That is a loss of about 10% of your storage capacity. 


Blumotion from the back. More wasted space
 

In this photo, the back end of some Blumotion drawers, you’ll see a little device sticking out. This thing supports the back end of the drawer, and provides a simple way to adjust the drawer up and down. This gadget takes up space, and also limits how deep the drawer can be, since the hardware only comes in a handful of sizes. With Accuride, or any side mount hardware, you can make the drawers deeper than the actual hardware. If you’ve got room for a 22 ½” inch drawer (as you would in a standard cabinet) you could use 22” hardware, built a 22 ½” drawer, and since the 4034 has something called “overtravel” it would still be entirely full extension. The corresponding Blumotion drawer is limited to 21”. That’s another 6% loss of storage. In the example in the picture, even more space is lost, because the cabinet is an odd size. 

So there is a loss of roughly 16% of your storage capacity, in exchange for a stylish, perhaps more quiet, hardware, that is in fact likely to be closed more of the time. 

Since kitchen storage, and real estate in general, is expensive, a loss of 16% of storage is significant, particularly in small kitchens with a limited amount of space. Your Accuride kitchen, with a bunch of big, wide, maximized drawers, is bigger than it looks, while the soft close style is smaller than it looks. 

We’ll be continuing to use Blumotion a lot, I’m sure, and now that I’m used to them, I can appreciate their virtues. But I will still hold out for the Accuride on the grounds of tradition, and also the idea that hardware doesn’t have to be concealed. I like seeing it there. It’s an old friend and I tend to like, slightly funky, visible, solid, traditional things whose function is obvious. We still draw with pencils! 

Our next experiment – we’re always the last to try anything new – is to try out the soft-close versions of the Accuride 3832. I think that will be OK, on moderately sized drawers, but won’t work on the behemoths we usually build. We’ll see. 

Sam 

New Year’s Eve, 2020

Friday, April 24, 2020

A Covid-19 Update by Sam Clark

Dear Friends, 

Like everyone, we are spending a lot of our time dealing with the Coronavirus, learning the new rules and precautions, and thinking ahead to a time when things are better. We have been able to continue working on a much reduced scale, and new rules allow us to do projects “with precautions.”  We’ve had several friends who have had the virus, but we are fine, though struggling with the lock down. 

But we are still here, thinking about and planning for future projects. I want to mention that we are now an LLC, and using the email sam@samclarkdesign.com. Also, our phone number now is 802 522 7715.

Sam 

Monday, March 16, 2020

Sam Clark Design, LLC - A Reboot

Sam Clark Design is rebooting a bit. We still will be designing and building kitchens, as we have been for quite a while. And we are continuing to let people know that we like to work on small kitchen – and think a small kitchen can be just a functional as a big one, maybe even more so, if well designed. But we’ve been enjoying furniture projects in the last couple of years and would like to do more. Over the years we’ve built a lot of beds, tables, sideboards, hutches, coffee tables and other items. 

Some recent furniture projects: 


We also want to emphasize what we call “inserts”. Not every kitchen has to be torn out and redone from the ground up. Often a kitchen has a decent layout and some OK cabinets. Often we can make some small, relatively affordable changes that make a big difference. For example, we can take a base cabinet with doors, remove the doors, and build a set of very purposive drawers which just slide into the existing cabinet (that’s the insert, or casette). We can also add shelves, dividers, or islands. The island shown in the photo at the top of this blog was formerly in an upstairs kitchen here. We moved it downstairs, added a new top (by Steve) and trimmed it out to match the kitchen.


Inserts: This was a neat '70s kitchen with wonderful soapstone counters. 

We built three sets of drawers to slide into the old door cabinets.


And finally, we are now Sam Clark Design, llc. In a few weeks we’ll be re-launching our website, and routing our blog through the website. My new email is sam@samclarkdesign.com, and my cellphone, 802 522 7715 is now the preferred phone number to use. 

Sam

Friday, December 6, 2019

Schoolhouse renovation

We mostly design and build kitchens and other built-ins, and do the smaller renovations that go along with such projects. We don't usually do big additions, houses, or major renovations. Except when we do. 

This is the Riley's schoolhouse. I want to talk about this project at length (though just look at the pictures if you prefer) because it shows something about how we think about design.


The Riley's house sits high on a hill, with lovely Vermont views, next to a beautiful white country church. Like most one room schools, it was converted into a house many years ago, and has been renovated several times since then. Yet it still had the flavor of a country school, a lot of the original materials, and one huge, wonderful central room, the old schoolroom, with those enormous windows along two walls.


The Spiral Staircase was a big problem. Photo by Susan Riley


The house had some basic problems. The upstairs was Susan's painting studio, but it barely worked. There was little storage. With little cross-ventilation, it got overheated in summer. She wanted to be able to have open studios up there, but the only access was the treacherous spiral staircase in the photo. They were currently sleeping upstairs and using a minimalistic bathroom downstairs. They wanted a downstairs bedroom, with a decent accessible bathroom.


Existing Kitchen

Downstairs, the kitchen work area was tiny, and barely functional. The cabinets and storage were minimal. The stove actually stuck out into the hallway. The back bedroom was barely heatable, and the atrium door to the outside turned the space into a hallway. The garage space didn't work as a garage, and flooded on an annual basis.

Existing Plan


Right in the middle of the main room, was this spiral staircase, dangerous, awkward to use, and not really legal from an egress point of view. I wanted it gone!


It boiled down to one question: could we make the house into a place where they could live and work for the next twenty years, or should they be moving to a completely different home?


That option made me sad, because the schoolhouse was such a wonderful place, and had features, and a feeling, you would never find in another house.


The first idea was to design an addition to provide an accessible studio where Susan could work and visitors and clients could see her work. This wasn't a bad idea but was expensive and had permitting issues.


After a lot of discussion, we learned the basic truth of the house: It had more than enough space, but was poorly laid out. It was a big house that functioned like a small, cramped uncomfortable house. If we fixed the layout, there was enough room without adding new space.


The upstairs would work fine as Susan's studio with better windows and ventilation, a proper staircase, and lots of storage for artwork. Downstairs, though, more drastic measures were called for, but they would make a huge difference.


It would be a massive, messy project, but cheaper than building an addition, and we hoped cheaper and better than moving. I felt that if we thought about it enough, and drew and discussed enough floor plans, we could retain all the charm and style of the space, but make it function as it should.


A project like this can easily get out of hand. Wherever possible we leave things alone. For example, the large stage that Dick used as his office – he's a choral director, and a grand piano is basic equipment – was perfect as is. We went to great lengths to save what we could: a tile shower downstairs, some built-in closets, old floors, and huge amounts of old bead board.


I hoped when we were done, it would look as if it had been like this for years.

Revised Plan

This was every bit a collaboration. I made the drawings and estimates for the project, but Dick and Susan worked with us through every iteration, every calculation, and most every detail. My partners Steve Grunewald and Todd Krumperman were fully involved in reviewing everything about the design, and not shy about critiquing the plans, and insisting on improvements. Somehow in that messy process I hoped we would end up with a result that looks inviting, but also logical, peaceful, as if it was this way all along.


The basic moves:


It wasn't easy to move this hall, but it made room for a bathroom and a much bigger kitchen, without messing up the stage area.

Move the downstairs hallway: Moving the hall was the key. This wasn't easy – there was a chimney in the way, and we had to shorten up the stage area. But it made room for a real bathroom, and allowed us to expand the kitchen. It made the back bedroom work better also.


Stairs: Getting rid of the spiral, and building a real staircase in a better location at the edge. It was tricky to make all the head rooms work. It was a matter of inches all the way, particularly leaving room for the bathroom tucked under the stairs.


The new staircase is along the wall as you enter, and rises below an existing dormer upstairs.


New Kitchen.


The new kitchen was styled to go with the 19th century bead board schoolhouse vibe, but had many of the modern devices we usually do: lots of drawers, open shelves, good provisions for trash and composting, and a nice slate counter at the sink, with draining shelves above.


Garage/to utility room: A non-functional garage, which flooded each year, got some foundation work and a new floor, and became a laundry, storage space, and utility room, with a modern boiler.


Air and Light: Upstairs, aside from the staircase, the big changes were adding a large new triple casement to maximize light and air movement in the front, and replacing old double hung windows in the rear of the building with new casements. Also, lots of storage for art-work. Moving the spiral staircase made the space a lot bigger.


The rebuilt studio, with new window providing plenty of ventilation. Photo by Susan Riley


Simple Flat Files tucked into the eaves, with a “gallery shelf” above.


Photos by Nicky Morris, except as noted.

Monday, May 22, 2017

A Client's Perspective - Working with Sam Clark Design


Last fall Dave and I decided to renovate our circa 1977 kitchen with updated cabinets, counter tops and shelving. We have a simple salt box style house finished with a lot of wood and other natural materials, so I was on the hunt for a custom cabinet maker who had a simple, yet elegant and natural style that would match the style of the house. We wanted a serious upgrade from the 40 year old stock cabinets and pine board open shelving in the old kitchen, but also wanted it to blend in with other aspects of the house. Changing the footprint wasn’t in the game plan, but we were hoping to modify the design to improve the efficiency in our small kitchen. As soon as I saw Sam Clark’s work on his blog and website, I knew I wanted him to build our kitchen. 

I felt comfortable with Sam from the first time we spoke on the phone, and even more so when we met in person. Having done this for years, he is very skilled at working through the process of developing a design and all that it entails, yet open to other ideas. I felt that he accommodated me easily when I had a good idea of what I was looking for, and could easily take over and offer suggestions when I was vague my preferences. He suggested small changes in the layout - moving the stove and sink to allow for more counter space, which have significantly improved the function of our kitchen. A few phone conversations to decide drawer height and contents, and our design was finished. Because of Sam’s extensive experience in designing kitchens for improved function, I had complete confidence that all his suggestions would work out, and I was right.

Sam was very clear about the schedule for installing our kitchen, and did not have to adjust it in any way. While we were away for the week they did the installation, when we stopped by a few times everything was neat and tidy. All told, it took 6 days from start to finish, which I think is a new world record. 

We’ve been using our kitchen for about 4 months now, and have enjoyed every minute of it. The kitchen is the centerpiece of our house (like most homes!) and it is such a joy to have it be both so beautiful and functional. We had very high expectations when we started our project, and yet both Dave and I believe our expectations were exceeded. The wood of the cabinet fronts is so beautiful, especially with small details such as having the wood grain extend into the next drawer front for a continuous look. The dish drainer makes doing dishes much more pleasant as they don’t all have to fit in the small dish rack. Everything is right where we need it after designing the custom drawers. I no longer have a meltdown every time I try to match a Tupperware top and bottom. Because the kitchen fits much more in a smaller space, we were able to open up the area above the stove so that the house has a much more open feel. We can’t thank Sam Clark and his crew enough!

The new kitchen in the same footprint as the old kitchen.

The stove was shifted to provide more counter space.

Beautiful wood grain throughout. Built in dish drainer next to and on wall. .

A place for storage containers and their lids for ease of use.

Built in knife rack and drawer dividers allow for improved storage.