Showing posts with label Kitchen Drawers. Show all posts

Sunday, January 10, 2021

Drawer Hardware

Between work, Covid, and writing projects, we haven’t taken time to do a post in a long time. But here are some thoughts on the fascinating subject of drawer hardware. 

When we started out, we didn’t build a lot of drawers, and mostly the ones we built did not have drawer hardware at all; they moved on wooden slides. Our neighbor, Ted Dodd made a lot of drawers on his projects, and had worked out a way to make highly functional full extension slides just with wood. At the time, this seemed excessive to me. 

Now I know better: good full extension drawers are a key part of good storage, good accessibility, and good kitchen design. I’ve never learned to make these slides out of wood, but we do use a lot of good full extension hardware. 


The classic Accuride 4034
 

We tried out a variety of drawer slides, but finally stumbled on the Accuride 4034, a “file drawer slide”, 150 lbs capacity, available in a variety of lengths and made in the USA. This was maybe forty years ago, or more. 

These slides don’t last forever; after fifteen or twenty years, a few will need to be replaced. But they are still available, and still my favorite. They do have two drawbacks: you have to close the drawer yourself. And the hardware is visible. If that’s indeed a drawback. 

Now the fashion is for concealed, undermount, “soft-close” hardware. The brand we use is made by the German outfit Blum, which I believe originated the design. They are very popular on manufactured cabinets. Probably half of our customers ask us for these. 
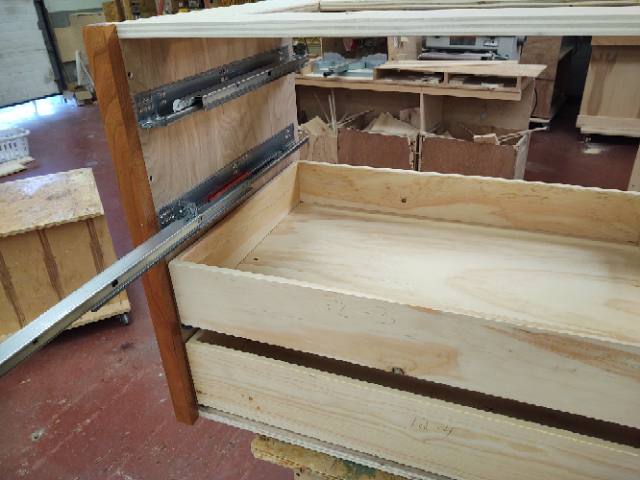
Blum soft-close “Blumotion” slides (without the finish drawer front).

I resisted these at first. Why conceal the drawer hardware? Is it so hard to close a drawer? But customers insisted. At first this new system seemed to make drawer building more complicated, and installation much more difficult. I have since learned that the slides are in fact really clever, not that hard to use, easy to install, and work really well. So I have become a begrudging fan. 

However, they do have some significant drawbacks. They are complex, and have a bunch of plastic parts and little springs which provide the self-closing function. Will they last as long as the Accuride? Who knows, though we have had no failures to date. My biggest observation is that they waste a lot of storage space. The hardware below or between the drawers is bulky. About an extra inch of potential storage space is taken up by the hardware, per drawer. So if a stack of 4 Accuride drawers gives you a net 26” of vertical capacity, your Blumotion drawers will give you about 23”. That is a loss of about 10% of your storage capacity. 


Blumotion from the back. More wasted space
 

In this photo, the back end of some Blumotion drawers, you’ll see a little device sticking out. This thing supports the back end of the drawer, and provides a simple way to adjust the drawer up and down. This gadget takes up space, and also limits how deep the drawer can be, since the hardware only comes in a handful of sizes. With Accuride, or any side mount hardware, you can make the drawers deeper than the actual hardware. If you’ve got room for a 22 ½” inch drawer (as you would in a standard cabinet) you could use 22” hardware, built a 22 ½” drawer, and since the 4034 has something called “overtravel” it would still be entirely full extension. The corresponding Blumotion drawer is limited to 21”. That’s another 6% loss of storage. In the example in the picture, even more space is lost, because the cabinet is an odd size. 

So there is a loss of roughly 16% of your storage capacity, in exchange for a stylish, perhaps more quiet, hardware, that is in fact likely to be closed more of the time. 

Since kitchen storage, and real estate in general, is expensive, a loss of 16% of storage is significant, particularly in small kitchens with a limited amount of space. Your Accuride kitchen, with a bunch of big, wide, maximized drawers, is bigger than it looks, while the soft close style is smaller than it looks. 

We’ll be continuing to use Blumotion a lot, I’m sure, and now that I’m used to them, I can appreciate their virtues. But I will still hold out for the Accuride on the grounds of tradition, and also the idea that hardware doesn’t have to be concealed. I like seeing it there. It’s an old friend and I tend to like, slightly funky, visible, solid, traditional things whose function is obvious. We still draw with pencils! 

Our next experiment – we’re always the last to try anything new – is to try out the soft-close versions of the Accuride 3832. I think that will be OK, on moderately sized drawers, but won’t work on the behemoths we usually build. We’ll see. 

Sam 

New Year’s Eve, 2020

Sunday, October 26, 2014

Before & After: How To Make A Small Kitchen Work Like A Big Kitchen


We work on small kitchens a lot. They can be great to work in, with enough storage and work area, if done well. But often basic layout mistakes make them almost non-functional. Sometimes we are able to make a variety of small adjustments that solve the problem. In this case, we were able to reuse a lot of the existing kitchen, without making radical changes in the layout.

BEFORE - Lazy Susan cabinet in center corner
This isn't a great “before” picture of Jim and Phyllis's kitchen, but it shows the basic problems. The larger issues are that the sink work area is very awkward, and there is almost no base cabinet storage. As a result, stuff piles up on the counter, eating up the workspace. The upper shelves work pretty well; they hold a lot of stuff.

We thought a lot could be done with this, though, without tearing everything out.

BEFORE - no counter space left of sink
Looking at this from left to right, we come to a standard 33” double sink, right at the end of the counter. That's the first problem; you really need counter on both sides of a sink. It also shows the beginning of a solution. If you have a small kitchen, you need small appliances. A smaller sink opens everything up. We often use something known as a D sink. It's only 24” or 25” wide, but very big front to back compared to a standard single. You get a big sink in a small space. We're looking for inches here. This gives us about 11” of real estate we didn't have before.

Next to the sink cabinet you'll see a 24” dishwasher. We use a lot of smaller 18” dishwashers. They work fine for a small household. Now we've got another 6” to use for storage space.

To the right of the dishwasher is a lazy susan. The idea of the lazy susan is that it accesses the storage in the inside corner, potentially 4 square feet of storage that might otherwise be wasted. It sounds like a good idea, but the trouble is that to get to this space, you have to take away a foot of base cabinet left of the corner, and another foot to the right. The result is that to get 4 square feet (in plan view) of storage that is mediocre at best, you sacrifice 4 square feet of potentially much more convenient storage. And it's actually worse than that, because the susan has two levels of round shelving, whereas drawer cabinets could have up to four levels, a net loss in volume of probably 50% or even more. We almost always want to take out the lazy susan.

It's often the case that we end up ripping out everything from the existing kitchen. But, aside from reasons of cost, there were some good things about the existing setup. Those nice shelves. The workspace between sink and stove. And that nice set of perfectly good birch full extension drawers to the right side. And there was nothing wrong with the cabinetry to the right of the stove, another nice set of full extension drawers.

AFTER - new sink, new drawers, smaller dishwasher, better use of space
That's Jim Campen modeling the new kitchen. Jim and Phyllis are old friends, and Jim and I have gone on many bicycle tours together. Again moving left to right, we've used that D sink, bigger than it looks. This is made by Franke, who I believe originated the design. The smaller sink makes room for some much-needed counter to the left. There is a nice trash pullout below that. Pat Garrett and Shane Thurston carved “runnels” in the counter on that drain board side. Very nice. Putting the drain board left of the sink, liberates the counter on the right for cooking.

The dishwasher is 18”. Actually, 17 3/4” because it a Bosch, which is metric. Next you'll see a shiny new 18” set of drawers by the dishwasher. Except it isn't. It's the old set that used to be between the lazy susan and the stove. We made the new cabinets out of birch, and Steve Grunewald, who installed this with me, was able to restore the shabby and dirty fronts of those drawers to new condition.

Then, next to the stove, is a new set of matching, wide, 30” drawers. Some thought went into what was going to be stored where, so that the drawers could be the optimum depth. This more than doubles the available base cabinet storage that was there before. If kitchen design theory was going to be reduced to two words, they would be “big drawers.”


Planning what goes where, and how, means the drawers can be just the right size, and hold the maximum amount.

Wednesday, January 22, 2014

Laying Out Drawer Sizes: Why We Do It and How We Do It


The usual practice in cabinet manufacturing is to offer a few standard drawer configurations, often getting deeper toward the bottom of the cabinet.

One of the advantages of custom building is that there's no need to standardize. You and your customer can think through each drawer: what should go there, how much space it needs, and what dividers might be useful.

If you do this kind of planning, you'll often end up with more drawers, and maybe 15% to 25% greater storage capacity overall. It's also worth mentioning that big drawers are a good value in custom cabinets, because the labor in a wide drawer is about the same as in a smaller one.

For example, 3” is plenty for silver, but 3.5” is better for utensils.There's also no unbending requirement to put the biggest drawers at the bottom. You might decide that you have this heavy mixer you use a lot, which requires a 13” drawer. Maybe you want it in a top drawer so you don't have to bend down to pull it out.

Another factor is what we call the “optimum reach zone.” The top two drawers, the back of the counter, and the lower shelves on the wall are the absolutely best, most convenient, easiest-to-access storage. You don't have to be tall or have good knees to get at that stuff. So in planning drawers, we often put the most-used items in the upper one or two drawers. It saves a lot of needless walking, bending, and searching while cooking or cleaning up.

Of course, for regular readers of this blog, I don't have to mention the First Rule of Gilbrethian Ergonomic Design: Storage at point of first use! Whenever possible store things where you will be located when you need that thing. The things you use the most get the premium storage.

In Figure 1, the boxy top drawer in Cabinet F is for bottles of oils and sauced, right by the stove. To the left, two drawers for spices. These are constantly used items, stored right where they are used.


Figure 1 - Custom Drawer Sizes

Usually my customers and I work over these locations a number of times to get it right.

We start by figuring out what kind of drawer hardware they want. If we use side-mount Accuride, you'd have about 26” of capacity to distribute over 4 drawers. With those hidden softclose “Blumotion” drawers, you have more like 23”, because the hardware takes up space between drawers. With the less costly Blum Metabox drawer system, you get around 24”. In a three drawer stack, you get a little more.

I give people a little chart of typical depths of drawers for certain contents (Figure 2) as a starting point; their actual stuff may differ from these average drawer capacities.


Figure 2: Drawer Depth Chart

After we talk about it a while, we try to get a few key things located. Maybe knives, utensils, silverware, those tall bottles of oil, and so on. We take a set of elevations, and start to label what goes where. We're working toward a chart that shows the contents and depths of all the drawers in a given stack. Figure 3 is the chart for this bit of cabinetry.


Figure 3: Chart for Custom Cabinetry

This might seem confusing. But it's pretty easy, fun, and definitely worth it. Getting specific in this way often introduces a little visual variety to how the kitchen looks.

In the shop it might seem very difficult to be constantly changing your layout for hanging drawers hardware. But we make a little template stick for each bank of drawers. The stick is the height of the cabinet, and shows all the relevant clearances and dimensions. We use it for every step of the cabinetmaking process. It's not really extra work, and the results are much better.


Ian Maas using a Template Stick while creating custom cabinetry at the SCD Shop


Thursday, December 15, 2011

Metabox: The no-drawer drawer

Another product that gives a custom result at less cost is the Metabox Drawer System, made by Blum, one of the largest German manufacturers of cabinet gear.

Usually when you make a drawer, you build a wooden box, the drawer box, often with dovetail corners. Then you finish it. Then you mount costly hardware on it, and attach a finish front on it in the wood of choice. Very nice, classic, elegant. But there are so many steps in the manufacturing process; its intrinsically expensive.

The usual kitchen design solution to this conundrum is to minimize the number of drawers, and put in a lot of door-front cabinets. The problem with this is, door cabinets hold about half what a bank of drawers can, and what's in there is tough to extract.

With Metabox, the hardware is the drawer sides and the drawer structure. You don't build a box at all. You mount half the hardware on the cabinet, the other half to a 3/4” plywood drawer bottom (which you have already varnished), then the drawer is literally ready to hang in the cabinet. Then you attach the drawer back, and the finish drawer front, with cute little adjustable clips.

If you built a metabox drawer, with a plywood or maybe Valchromat front, you would have a full extension drawer with all the practical virtues of a conventional drawer, but at a much lower cost.


Wire Baskets and Drawers

One of the key ideas of good kitchen design, going back to the early days of kitchen research can be summed up in one word: drawers.

Drawer cabinets in base cabinets hold much more than door cabinets, and it's much easier to find and retrieve what you need without strain. But drawer cabinets do cost more than door cabinets to buy or build.

We use a lot of wire baskets. The picture shows a stack of Elfa baskets installed in a run of cabinets. We get them from The Container Store, which has a great online utility for pickout out what you need (Elfa Drawer Planner). The frames come in various heights and widths, and have a slide on a four inch interval. You can then insert 4”, 8”, or 12” baskets as needed. It takes just a minute or two to put the whole thing together.

What you get is a set of interesting drawers for about $150. They can be used to store most anything, but we use them a lot for produce that can benefit from a little air flow.